
Kowakujo Main Easter Egg Guide, All Steps
Work In Progress: This guide is still being checked and expanded, so some details may change.
Every step of the Kowakujo main quest Easter egg, in order: the map basics, the Nekomancer wonder weapon, five evidence boards, the Solve The Mystery step and the Nyxara boss fight. The video above covers the same steps in under 10 minutes.
Before you start
- Follow the steps in order. Skipping around is not recommended.
- If you fail a step and cannot continue, go to the next round and try again.
- The solvers and the full cheat sheet for this map are linked in this guide and on the Kowakujo tools page.
Basic Map Setup
Pack-A-Punch
- Recapture the wards by interacting with the dragon flags and staying inside the spawned circle until it completes. There is one in Training Area and one in Kitchens.
- This unlocks the doors to Central Courtyard.
- Go up to the War Room and eliminate the Oni to get Shogun's Hanko.
- Open the doors and kill zombies near the World Seed. Pack-a-Punch spawns.
Maneki-Neko
The Maneki-Neko is built from three parts. Each part can be found in several places.
- Cat Statue: Gatehouse at the crates, Kitchens by Double Tap on the barrel, or Kitchens on the barrel under the fish.
- Furin Bell: Staging Area up high, Stables on the buried house, or Training Area next to the wall buy.
- Karakuri Doll: Storage Room across from PhD, Storage Room down the hall from PhD on a desk, or Workshop to the left of the staircase.
Build it at the station near Vulture Aid. If you lose it, you can repurchase it for 500 Salvage. The Maneki-Neko counts as a tactical lethal.
Nekomancer Wonder Weapon
To start this you need the Maneki-Neko, PhD Flopper and Death Perception.
- At the Tenshu entrance, PhD dive onto the cage underneath to plunge it.
- Pick it up, carry it and drop it in any active lava pool to free the cat.
- This spawns a volcanic fissure that consumes one of four areas: Stables (before Staging Area), Flower Garden (before the building), Kitchens (before Central Courtyard) or Training Area (before Stables).
- Getting a kill in that area's entrance spawns pawprints. Kill a zombie about 7 meters away from your current pawprints, in the direction they face, to spawn the next set. Repeat until you have a circle of pawprints.
- As long as the area still has lava and has not molten over, throw a Maneki-Neko at the circle. An Abomination spawns and you must kill it.
- Flip a round. Orange creaky floorboards appear in Training Area, in Kitchens near the Novaline wall buy and in Kitchens near the Mystery Box.
- A cat is sleeping at one of these locations. Do not shoot, sprint or use a field upgrade. Move slowly across the non-orange floorboards and pick him up.
- Deliver the cat to the World Seed. It gives off a damaging pulse, so time your approach between pulses and melee it 3 separate times. The wonder weapon drops to the floor.
The Nekomancer's charged right trigger shoots a pool onto the ground that kills for a few seconds. The left trigger is a single shot.
Board 1
Lanterns
- Around the map, activate the 11 lanterns with the Nekomancer in rapid succession. Following a set path makes this easy.
- This spawns a ghost in the War Room. Interact with it.
Fox Mask
- When the ghosts vanish, ride the kite at the Tenshu rooftops.
- Immediately hold D (or push your thumbstick right) to glide down an alternate right-hand pathway, and interact with the Fox Mask sitting there.
- Place the mask on the wall in Storage Rooms to start a Simon Says. Masks flash one by one, showing the exact order in which you must kill the matching newly spawned masked zombies.
- The sequences run in rounds of 3, then 4, then 5. Interact with the wall after each completed sequence to start the next.
- After the sequence of 5, a cutscene plays and the Fox Mask flies away. Shoot it in three locations to collect parts: Workshop for Takeshi's Pipe, Collapsed Study for Takeo's Case and Onsen Baths for Mitsuhide's Comb.
- Interact with the evidence shelf in the Meditation Room to reveal Board 1.
Board 2
Coin Purse
- Check the bottom corners of the Mystery Box for a rectangular symbol card. If it is not there, buy the box until it moves, which puts it in the right location.
- Throw a Maneki-Neko at the box first, then spin the box for a guaranteed Gold Coin Purse.
- A ghost Coin Purse spawns at Outer Ward. Interact with it for a cutscene.
Gardening Sheers
- Get a Water Bucket. Possible spawns include Tea Garden, Stables and the Onsen Baths.
- Interact with the water in the Baths to fill it. The bucket holds 3 levels, and getting hit, sprinting or jumping spills a level. Walk to the Flower Garden, tiptoeing around lava and zombies.
- In the Flower Garden, water these 3 plants: the one at the base of the bridge, the one down the pathway to the left of the bridge and the one on the other side of the room near the bridge.
- The area's two flower pots glow yellow and an immune Gardener spawns. To kill him, damage the glowing flower pots first, then shoot him.
- This rewards the Gardener's Sheers and his notes.
Mercantile Abacus
- In Kitchens, melee the basket to knock down a tomato.
- Leave it until the end of the round so a zombie stuffs it in its mouth.
- Kill that zombie at Staging Area in front of the barrier to spawn the Merchant.
- He regenerates health, so kill him fast to claim his Abacus and sales note.
Noble's Hat
- In Training Area, throw one decoy at each of the three windows within about 10 seconds to break them.
- The Noble zombie now throws grenades at you. Pick them up and throw them back at him through the windows.
- After enough hits he drops the Noble's Hat and paper evidence.
Place all of this evidence on the shelf in the Meditation Room to reveal Board 2.
Board 3
Monkshood Flower
- In Flower Garden, grab the flower and place it in the pot at the Tenshu entrance.
- In Training Area, charge-shoot the pouch with the Nekomancer and pick it up.
- When a volcanic fissure consumes any area, stay inside for about 50 seconds to fill the pouch with ash.
- Place the ash into the Tenshu plant.
- Find a cherry blossom tree that still has leaves and melee it repeatedly until it gets an orange glow. This lets you spawn a tornado by running in a circle.
- Do this in front of the plant to get the finished flower.
Pufferfish
- Melee the scrolls in Storage Rooms to start the puzzle mini-game. A Maneki-Neko spawns next to it and chases away all zombies.
- Shooting or meleeing a scroll moves it along with a few others. The goal is to have every scroll pushed inward. You have about 10 seconds, so use the Scroll Grid solver: inspect the scrolls from the side, select every scroll facing outward and hit Solve.
- Completing it gives paper evidence and a pestle.
- Place the pestle in the bowl in Kitchens to start a soul collection. Only weapons with Brain Rot ammo or charged Nekomancer shots count.
- After enough kills, interact with the ghost pestle for a short cutscene. When it ends, pick up the Pufferfish on your left.
Plum Pit
- In Kitchens, melee the basket to knock over a green plum.
- Keep jumping on it until you get the pit.
Place all evidence on the shelf to reveal Board 3.
Board 4
- Grab two shard fragments: one directly off Board 3 and one on the floor at the War Room door. Also grab the evidence to the left of it.
- At Tea Garden, assemble a cup on the table.
- Flip the round, then interact with the ghost cup for a cutscene.
- When it ends, place the cup in each of the following three locations, in any order, to start a defend. If you fail, rebuild the cup next round and try again. Completing each one gives an item and returns your cup.
- War Room gives the Horse Silhouette. Collapsed Study gives the Calligraphy Brush.
- Tea Garden: a dog steals the item and runs away very fast in a loop. Go the opposite way to catch it, which is easiest from the hillside pathway, to get the Tea Whisk.
Place all new evidence on the shelf to reveal Board 4.
Board 5
Netsuke Of Brothers Statue
- At Stables, wait for the lava to harden.
- Throw an explosive at the tiny statue to knock it loose, then grab it.
Crest Medallion
- Interact with the clock in Storage Rooms. A repeating sequence of 4 numbers plays.
- Around the map, blue symbols appear in these locations: Stables, Outer Ward, Flower Garden and Central Courtyard. Each symbol matches a position in the clock sequence, 1 to 4. For example, symbol 3 matches the third number in your sequence.
- Progress rounds until you get a defense round that spawns 6 flag zombies. Killing them sends their flags to Staging Area.
- Flags can be picked up, dropped and swapped at any of the holders in front of the symbols or back at Staging Area. A flag's value is the number of whatever symbol is on it, whether circles, stars or anything else.
- All 6 flags must be used, with 1 or 2 flags at each location, and the flags at a location must add up to that position's clock number.
- Example from one game: symbol 1 had a clock value of 5, so 2 and 3 went there. The second clock number was 11, so 5 and 6 went in front of symbol 2. Four flags were used, so the last two symbols each took one flag, still matching their clock values.
- If done correctly, interact with the clock again to get a Medallion and paper.
Place all evidence on the shelf to reveal Board 5.
Solve The Mystery
Two quick tips: the left incense stops zombies from attacking for 60 seconds (just do not shoot), and the Mystery solver works out all five items and the dial position from your game's info.
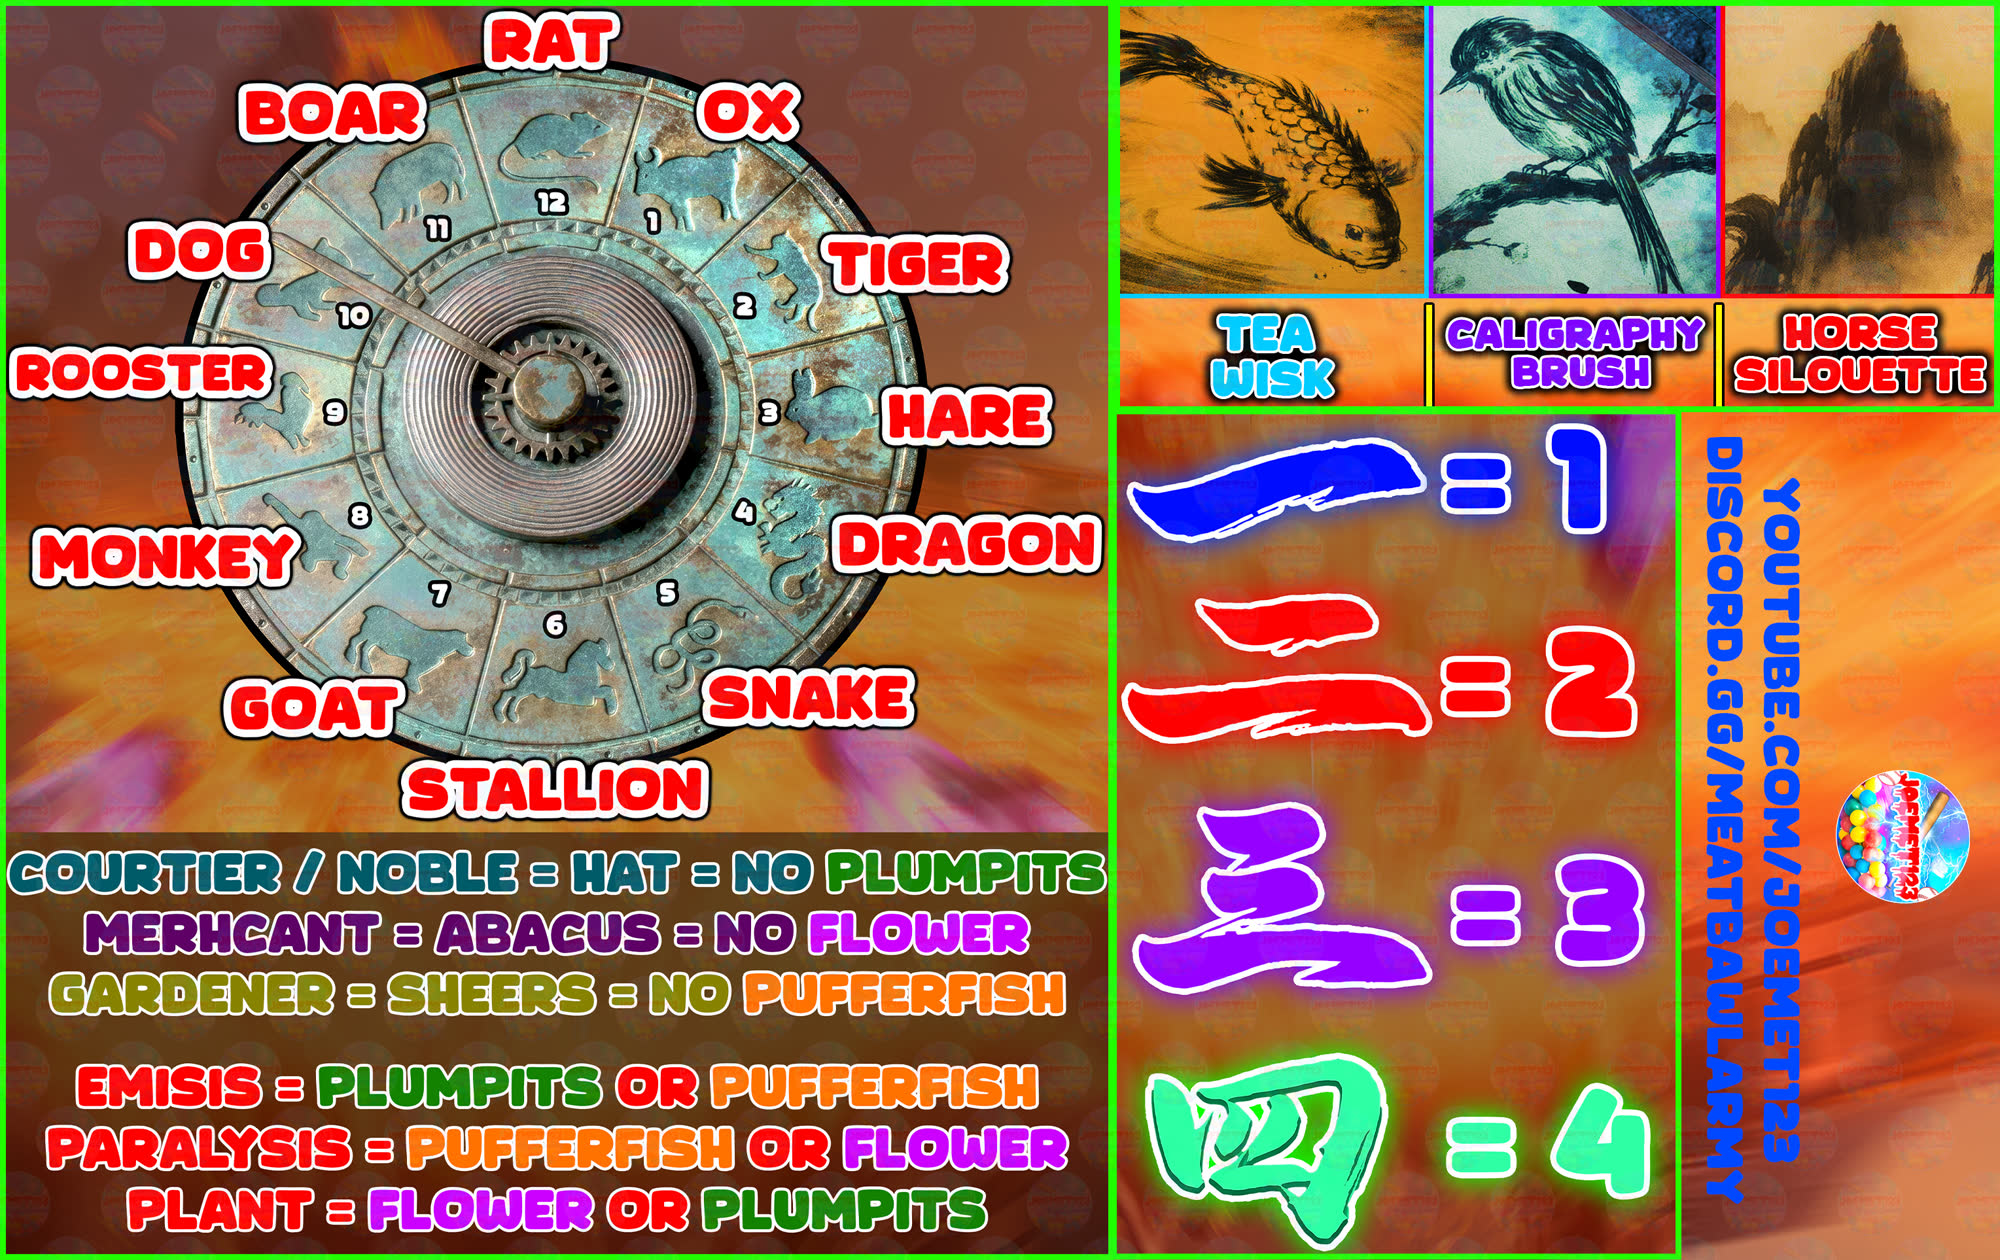
Slots 1 And 5
These are the same every game. Slot 1 is the Comb and slot 5 is the Crest Medallion. Place them in their slots.
Slot 2
Each of the three traps needs 15 kills to spawn a ghost behind it, and one of the ghosts points out a specific accomplice. Take that accomplice's item from the shelf and place it in slot 2.
- Gardener: the Gardening Sheers
- Noble or Courtier: the Noble's Hat
- Merchant: the Mercantile Abacus
Slot 3
- Read the Doctor's Note (Note 1) to find the cause of death and the symptoms.
- Read the Toxin Note (Note 5) and match Note 1's symptoms to it. For example, if you see Paralysis, that rules out Plum Pits because paralysis is not one of its symptoms.
- That leaves two items. Your accomplice decides which: a Noble can never be Plum Pits, a Merchant can never be Flower and a Gardener can never be Pufferfish.
Example: the symptom was Emesis, which leaves Plum Pits or Pufferfish. The accomplice was the Gardener, who can never be Pufferfish, so the item had to be Plum Pits.
Slot 4
Inspect the picture on the fourth portrait.
- Fish: Tea Whisk
- Mountains: Horse Silhouette
- Bird: Calligraphy Brush
Animal Dial
- Re-inspect your notes. In Note 5, check how many hours your toxin, placed at Board 3, needs to take effect. In Note 1, check the time of death, listed as "Hour of the" followed by an animal.
- On the dial to the left of the portraits, find that animal. Move the pointer backwards by the number of hours Note 5 gave you.
- Interact with the incense on the right side of the portraits to lock it in. If anything is wrong, bosses spawn and force you to the next round.
- Success spawns an orange orb that floats into the World Seed.
Lockdown
Interact with the World Seed to start a lockdown. Defeat the Heavy Oni boss. If he disappears, shoot all the red floating masks to bring him back.
Boss Fight
To enter the Nyxara boss fight, interact with the new kite near Pack-a-Punch.
It is a simple three-stage fight with one new mechanic: flags. Take out an Oni boss, grab his flag and stand in a red circle until it charges. Once all zones are captured in any phase, a blue aether shroud bubble spawns. It protects you from all incoming attacks and lets you deal far more damage.
Blessings on pedestals
- Veytharion: upgrades your weapon
- Dravakar: instantly captures all flag zones
- Caltheris: makes you spew fireballs
Your priorities
- Use the flag circles for extra damage and protection.
- Target Nyxara's orange weak spots.
- Use the blessings.
- Sometimes use the larger boulders as a safe zone.
- Keep watching Nyxara and avoid its attacks.
Attacks to watch for
- A trio of fireballs and raining rocks
- A targeted laser that explodes along its seam
- Fire on the floor
- Tornadoes, which you must sprint directly away from
Phase 1 has one weak spot and one flag location. Each phase after that reveals one more flag and one more weak spot.
Want The Tool For This Step? Open The Free Solvers.